

 Die Ceriola, die ich letzes Wochenende gebacken habe, hatten mich bereits ins schwärmen gebracht. Die Krume war locker, die Kruste rösch, das Aussehen wie aus der Bäckerei. Ein Testesser meinte dann allerdings, dass sie noch nicht ganz an die lockere Krume von Bäckerbrötchen herankämen.
Mich packte darauf hin der Ehrgeiz. Vielleicht mußte nur ein wenig an der Herstellungsweise geändert werden? Steve von Bread cetera hatte in dem Blog-Eintrag “More Musings on Mixing” eine intressante Technik vorgestellt. Dabei wird zuerst die Rührbesen der Küchenmaschine verwendet, um den Sauerteig mit dem Wasser verrührt, dann wird eine kleine Menge Mehl hinzugefügt und der Teig aufgeschlagen bis er schaumig ist.
Nun wird der Rest des Mehls zugefügt und mit den Spiralhaken kurz untergemischt. Dann folgt eine Phase der Autolyse. Nach der Autolyse wird der Teig geknetet, bis sich das Gluten entwickelt hat. Das geht wunderbar schnell. Man kann sehen, wie breits nach etwa einer Minute glatt und seidig wird. Nach weiteren 4min ist das Gluten entwickelt und der Teig ist wunderbar weich und locker.
Die Brötchen habe ich dann wie beim letzen Mal geformt.
Da ich nur 9 Brötchen gleichzeitig auf dem Backstein backen kann, hatte ich das anderen nach einer Stunde bis zum Abbacken in den Kühlschrank gestellt. Dadurch hatten auch die später gebackenen Brötchen einen guten Ofentrieb.
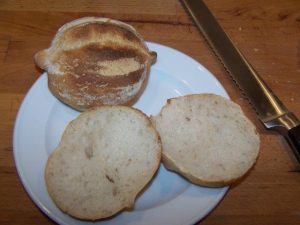
Beim Abkühlen haben die Brötchen dann zum Teil laut geknistert. Die Kruste war, wie das Knistern schon erahnen ließ, wunderbar kross und die Krume war nochmals deutlicher lockerer als beim letzten Mal. Jetzt kann wirklich niemand mehr behaupten, dass die Brötchen nicht locker genug sind 😉
Ceriola (neue Methode)
ergibt 26 Stück
- 400g reifer Sauerteig (100% Hydration)
- 1000g Mehl (Type 550)
- 20 g Hefe
- 2 TL Gerstenmalz
- 600g Wasser
- 2 TL Zitronensaft
- 4 EL Öl
- 24g Salz
Es werden die Rührbesen der Küchenmaschine verwendet, um den Sauerteig mit dem Wasser verrührt, dann werden 150g Mehl hinzugefügt und der Teig aufgeschlagen bis er schaumig ist. Nun wird der Rest des Mehls, der Zitronensaft sowie das Salz und das Malz zugefügt und mit den Spiralhaken kurz untergemischt. Dann folgt eine 30 minütige Phase der Autolyse. Nach der Autolyse wird der Teig 5 min lang geknetet, bis sich das Gluten entwickelt hat.
30 min an einem warmen Ort ruhen lassen.
Teigstücke von ca 75g – 80g abwiegen zu zu einer Kugel schleifen. Dann in der Mitte dem Handrücken flachdrücken, wieder zusammenlegen und die Enden spitz zusammenrollen. Mit der Saumseite nach unten gehen lassen.
60 min gehen lassen. In der Zeit den Backofen mit dem Brotbackstein auf 250°C vorheizen.
Nach dem Gehen die Brötchen wieder umdrehen und auf den heißen Stein einschießen und unter schwaden 25 min backen.
This is my post for Susans weekly YeastSpotting.
English (UK)

I’m glad you were able to get good results using the double flour addition technique. I, too, find that the gluten develops quicker using this technique.
YUM, I want to make a cheese and jam sandwich out of those rolls.
How do you introduce steam into your oven?
Hi Nick,
I use a spraying flacon (hope thats the right word), you normaly use to spray water at plants.
I spray at the walls of the oven after I put the bread on the hot stone. That gives a nice steam inside of the oven. I have this trick from the bread-baking forum from chefkoch.de.
Das muss ich ausprobieren 🙂
Stefanie,
Originally, I thought you were completely wrong…
Flacon: “A small, often decorative bottle with a tight-fitting stopper or cap.”
I have never heard that word before, but it appears to be OK. What we would normally say would be: “A sprayer” or colloquially, but more accurate: “a SPRITZER.,” from the verb “Spritz” meaning “A quick squirt or spray.”
I used to use this same method but have gotten better results from a very cheap home steamer, a Scunci Steamer
Nick,
The term “Spritzer” is my favorite then, because in german its “Blumenspritze”. The idea of using a steam cleaner to introduce steam to the oven is good, too.
Looking good — so cool that you got these results with Steve’s technique!
Pingback: Brötchen mit Poolish | Hefe und mehr
Nochmal danke für deine telefonische Unterstützung!
Um Mitternacht war dann auch die dritte und letzte Portion Brötchen fertig. Sie sind wunderschön geworden und schmecken sehr, sehr lecker.
Ich bin begeistert von diesem Rezept.
Pingback: Hefe und mehr » Blog Archive » Sacaduros – BBD #27
Ich würde die Brötchen gerne backen. Benötige ich für den Teig Roggen- oder Weizensauerteig? Ich habe noch einen angesetzten Roggensauer. Muss ich ihn erst füttern?
Liebe Grüße
Monika
@Monika: Ja, der Sauerteig muss gefüttert werden (200g Mehl Type 550 und 200g Wasser, 20g Sauerteig (egal ob Roggen oder Weizen)) und sollte bei 25°C etwa 12-16 Stunden (je nach Triebkraft) reifen lassen.
Danke für die schnelle Antwort. Ich habe doch noch eine Frage. Ist das Gerstenmalz aktiv oder inaktiv?
LG Monika
@Monika: Das Malz ist inaktiv!
Im Rezept wird der Zitronensaft nicht erwähnt – wofür?
@Manuel: Ich habe es im Rezepttext ergänzt. Er dient als Vitamin C-Quelle und somit zur Stärkung des Glutennetzwerkes.