

 Somewhere in germany, in the middle of the night: a dark figure sneaks out of the sleeping room and tiptoes into the kitchen. The alarm clock shows three o’clock. In the kitchen, the figure opens quietly cupboards and take out bowls, yeast and flour and prepares a poolish.
Then I tiptoe back to bed, think about if this is a case of “acute baking delirium“. But I plan to bake ciabatta this afternoon, so who cares 😉
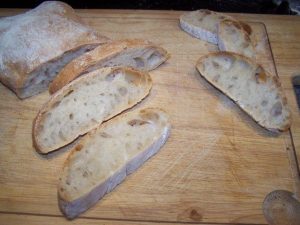
The Ciabatta that Steve from Bread cetera bake using the douple flour addition/ douple hydration, is very impressiv. White open crump, perfect crust, thats how a ciabatta should look like. And that exactly what I want to bake, too! I baked ciabatta maybe two or three times before, and was never satisfied.I had some biger air cells, but most of the crump was more or less dense.
So what is the diffrences in Steves recipe? At the first view, it is very similar: It asked for a poolish, use a small amount of yeast and a high hydration. But the handling is complete diffrent.
Because the gluten developmet needs oxygen, a part of the water and the flour is mixed with the poolish with the whisk attachment. And the incooperated small air bubbles also serves as cristallisation germs for the CO2 that the Yeast release during fermentation.
Because overoxydation leads to a degradation of carotinoides, causing a pale crust, the whisking of the batter should be not too long, around 3 minutes. Then the remaining flour is added and shortly mixed with the batter. Then the dough will be rest half an hour for autolysis. The autolysis give the proteins time to rehydrated, so the gluten development needs not as long as without this step. The third trick in preparing the dough is that the remaing water is added to the dough when the glutendevelopment is nearly done. So it is easier to knead the dough with the machine.
Untill that, I had no problems with handling the dough. But when I came to the point, where I should transfer the dough from the oiled bowl to the countertop, the dough refused to leave it. I had to use the dough scrapper to convince him to leave his home. I destroied some of the air bubbles by doing so 🙁 And after resting the dough on the couche on of the ciabattas sticked to the couche.
So my todays lessons is: Use more oil for the bowl and more flour for the couche :-/
But for all that I am very pleased for the result, because it is the best ciabatta I ever baked 😀
If you are looking for a nice videotutorial for shaping a ciabatta, have a look here.
Ciabatta
yields 2 Ciabatta
Poolish
- 190 g flour (Typ 550)
- 190 g water
- 2 g fresh yeast
Teig
- 310 g flour(Typ 550)
- 190 g water
- 10 g Salt
- 5 g fresh yeast
- 15 g olive oil
- 385 g (the complete) Poolish
Mix water, flour and yeast for the poolish and ferment it overnight (10 to 12 hours).
On the next day, use the whisking attachment of the kitchen machine to whisked the poolish with 140g water and 75 g flour to a well aereated batter(3 min). Now exchange the whisking attachment to the dough hook and add the remainig flour. Knead untill it is homogeneus (aroung 1 min). Let rest for 1/2 hour (Autolysis) In the meantime disolve the yeast in the remaing water.
After Autolysis: Add the oil and knead the dough untill 2/3 of the gluten developed (5 min), now add the salt and the water in small portions. Wait untill one portions is complete incorporated before adding the next one.
Now place the dough in a good oiled container and ferment for 3 hours.
Flour the countertop and carefully turn the dough on it. Divide the dough with a dough scrapper. Do this gently, so the air bubbles will not be destroyed.
Lay on a couche (floured) and cover with a second cloth and proof for one hour.
In the meantime heat bakingstone in the oven to 250°C.
Bake on the preheated stone for 35 min with steam.
Wer viele beeindruckende Brote sehen möchte, sollte Susans wöchentliches Yeastspotting besuchen.
Deutsch
Liebe Stefanie,
habe mich heute endlich mal aufgerafft, Dir zu schreiben. Dein Blog ist sensationell und Deine Rezepte fantastisch! Ein großes Lob an Dich! Ich bin ein großer Fan von Dir und Deinen Rezepten. Habe Ende 2019 das Brotbacken für mich entdeckt und Anfang 2020 Deine Website. Seitdem bin ich im Backfieber und backe fleißig Deine Rezepte – alles super und es gibt bei uns kein gekauftes Brot mehr! Heute war das Ciabatta an der Reihe. Ich habe 100 g Mehl durch 1050 ersetzt und zusätzlich zum Salz Kräuter gegeben. Dachte, ich bekomme den Teig niemals heil aus der Schüssel, aufs Leinen und aufs Blech – mit etwas Fingerspitzengefühl gings aber, puh, das war aufregend. Das Brot war genial – knusprig, aromatisch und fluffig mit riesiger Porung.
Hiermit möchte ich Dir einmal DANKE sagen für Deine tollen Rezepte!
@Kerstin: Vielen Dank für diese tolle Rückmeldung. Ich freue mich sehr, dass dir die Rezepte gefallen und das die Ciabatta so gut geklappt haben 😀
Ich bin ja ein großer Fan offenporiger Weißbrote (Dein absolut fantastisches Wurzelbrot https://www.hefe-und-mehr.de/2013/06/wurzelbrot/ mache ich zur Zeit mindestens einmal pro Woche) und würde nun gern auch mal das Ciabatta probieren. Ich würde nach dem Durchlesen vermuten, dass Rühren und Kneten in dem Fall auch mit der Hand gehen müsste, ja?
… ah, oder ich probier doch zuerst Ciabatta 2: https://www.hefe-und-mehr.de/2013/03/ciabatta-2/
@Brigitte: Alternativ kann ich dir auch dieses Dinkelciabatta sehr ans Herz legen!
Slap and fold schaut nach viel Spaß aus — dann werde ich also das Dinkelciabatta probieren. Danke für den Hinweis!
Habe heute erstmals diese Variante ausprobiert
und sie ist mit den angegebenen Mengen, insbesondere auch dem langsam zum Schluss nachgegebenem Wasser, bestens gelungen.
Der Teig war weich aber nicht zu weich, alles bestens.
Als Mehl habe ich Tipo 0 benutzt.
Nun werde ich nächste Tage alternativ Deine zweite ,weniger arbeitsaufwendige, Variante probieren
und vergleichen.
Bin schon echt gespannt, da ich lange Teigführungen schätze und mag.
happy cooking
Gerald
Nochmals nachgebacken, mit 10% weniger Wasser, dem selben Mehl wie das erste Mal, waren die Ciabatte viel besser zu verarbeiten und sind viel schöner aufgegangen. Freu mich schon auf den Verzehr:)
Ich habe das Brot nachgebacken und wie du vielleicht weißt, lebe ich in Italien, habe also den direkten Vergleich mit Ciabatta vom Bäcker. Das Brot ist mir etwas flach geworden. Während der Gehzeit läuft es ziemlich auseinander und geht gar nicht in die Höhe. Ich habe kein Bäckerleinen, wahrscheinlich hält dieses das Brot in Form!? Soll ich trotzdem probieren ein wenig mehr Mehl zu nehmen? Geht ein normales Leinentuch als Chouche auch? Geschmacklich hat mir diese Ciabatta (bei uns ist sie weiblich, weil sie auf italienisch auch “la ciabatta” heißt) VIIEEL besser geschmeckt als die vom jedem Bäcker den ich kenne.
@Magdi: Das Breitlaufen kann an der fehlenden Couche liegen. Du kannst stattdessen aber auch ein Trockentuch nehmen, am Besten eine stabiles aus Leinen oder Halbleinen. Aber versuch ruhig auch einmal, die Wassermenge zu reduzieren, vielleicht absorbiert dein Mehl einfach weniger Wasser. Ich hatte mal eine Mehl-Charge, die rund 10% weniger Wasser brauchte.
Danke für deine Antwort, ich werde es probieren und dir berichten:)
bin eigentlich noch ein ziemlicher Anfänger was das Brotbacken betrifft, habe mich aber trotzdem mal an dieses Rezept gewagt 🙂
Ist tatsächlich richtig gut geworden, auch wenn ich zwischendurch so meine Bedenken wegen der Konsistenz des Teiges hatte. Zumindest war er bei mir doch ziemlich weich gewesen.
Super Rezept, werde ich bestimmt bald mal wiederholen.
viele Grüße Oli
@Oliver: Das freut mich zu hören 🙂 Die Bedenken bei der Teigkonsistenz kann ich gut verstehen, so ein Ciabatta-Teig ist ja wirklich sehr weich und klebrig. Um so schöner finde ich, dass du es trotzdem gewagt hast und mit guten Ergebnissen belohnt wurdest!
Und wenn du magst, bist du auch herzlich dazu eingeladen, an meinem Geburtstags-Blogevent teilzunehmen, dazu braucht es nämlich nichtmal einen Blog 😉
Hallo Stefanie,
ich probier gerade dein Ciabatta. In drei Stunden werde ich mehr wissen, der Teig kommt mir nämlich verflixt flüssig vor, aber ich bin furchtlos und gebe nicht noch mehr Mehl dazu – bin neugierig, ob´s was wird 🙂
@Die Küchenschabe: Dann drücke ich die Daumen, dass es gut klappt, sehr weich und klebrig ist der Teig aber wirklich! Viel Mehl auf die Couche geben hilft, das Ankleben zu verhindern.
Hallo Stefanie,
ich habe dein Brot nachgebacken. Es ist super geworden mit einr schönen Kruste und riesigen Löchern im Brot genauso wie in Italien. Dein Blog ist echt super!
Ich las in deinem Blog, dass du im Wunderkessel-Forum bist. Benutzt du den Thermomix für’s Backen?
lg Alex
@Alexander: Das freut mich! 😀
Ich habe keinen Thermomix und lese im Wunderkessel-Forum nur mit, bin aber nicht angemeldet. Ich mag Foren nicht so gerne, da schleicht sich oft ein Umgangston ein, der mir gar nicht gefällt.
Pingback: Hefe und mehr » Blog Archive » Sauerteigbrot mit gerösteten Haferflocken
Pingback: Hefe und mehr » Blog Archive » Pane Pugliese – BBD#32
Hallo liebe Steffi,
Als ich das Rezept von Deinem Ciabatta gesehen habe, war ich total beeindruckt, und dachte, soetwas kann nur die Steffi!! Echt super!
Und dann habe ich beschlossen, es selber einmal auszuprobieren, obwohl ich der Meinung war, das ich es niemals so hin gekommen würde, wie auf den Fotos.
Aber:
Es hat funktioniert, und meine Gäste fanden es ganz toll. Ich danke Dir für die tolle Anleitung und die super Rezepte. Ich übe mich, und werde dranbleiben.
Bald nochmal ein MKF-Tag????
Ganz liebe Grüße,
Sarah.
Hallo Sarah,
Super, dass dein Ciabatta so toll geworden ist! 😀
Ein MKF-Tag ist eine gute Idee!
Liebe Grüße,
Stefanie
Dein Beitrag hat mich zum Lachen gebracht, und dein Ciabatta ist toll. Weiter so!
Hi, sorry quite a newbie here in terms of bread making but what is baking with steam? I don’t see a steam mode on my oven..
Help..
@ Yenswky: Baking bread with steam improves the oven spring and the crust.
There are diffrent methodes to introduce steam into your oven. I spray water into the oven with a spritzer, that is normaly use for spraying water on flowers.
You can put a bowl with boiling water on the bottom of your oven, too. Or you can use a home steamer like Nick suggested here
Maybe you like to visit Susans (Wildyeast) Blog, because here you can find a very nice post about using steam, too.
Vielen Dank für die vielen netten Komentare.
Thanks a lot for all these nice comments. 😀
Your ciabatta looks perfect. YUM!
Sieht richtig klasse aus! Kompliment!
Das sieht super aus!..und interessante Ausfürungen. Werde ich gleich nächste Woche mal probieren. Danke!
Schöne Krume. Dafür steht man doch gerne mal früh auf. 🙂
Stefanie, getting nice wide-open holes within an overall light crumb is not an easy thing to accomplish. You did a wonderful job with your ciabatta!
I love the “science” of this post. Despite yor protestations that is lovely bread.
I sympathise with your ‘sticking to the couche’ problem. I never put enough flour on…one day I will learn! 🙂
Stunning ciabatta.
FP
From the looks of your ciabatta one would never know you had any trouble with sticking. Gorgeous crumb there!
Das siehr wirklich sehr gut aus!